Ingredients
-
1 1/2
-
1
-
1
-
2
-
2 - 3
-
3
-
1
-
-
-
-
-
-
-
-
Directions
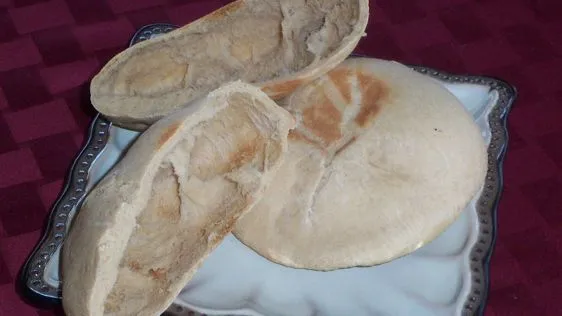
Whole Wheat Pita, This is a recipe I came up with when trying to get more whole wheat into my family’s diet. We love pita pockets and I couldn’t find a WW Pita recipe anywhere even here. So I made one myself. They are light and very tasty and ready in one hour to eat. One key is do not over cook them or let them brown at all., I forgot to rate it in my earlier review – it is 5 stars!, Sorry if this review is long but I wanted to give you my trials and successes on this one. First off let me say, my DH was so impressed. He isnt a pita man but he said these are better than bread and any pita’s he’s ever had! Ok, I was a little appliance challenged for this recipe but through trial and error, I conquered. I have an industrial mixer, however, it has 2 blades and all the dough kept squeezing to the top and wouldnt mix. So I thought I would use my bread machine. Well, I had it on dough setting and after it was done, the outside of the dough was too dry and crispy. I made them anyway. Although they didnt rise, they were still absolutely delicious. We used them as pizza bread instead. Ok, then I tried the dough setting but removed the dough after mixing and didnt let the bread machine make it rise. I then followed the recipe to rise for 30 mins. and so on. The HOLY GRAIL!!! Boy was it worth it to keep trying. I just dumped all the ingredients in and took it out when it was done. How easy! This is now my new bread for everything!
Discover ground-breaking new supplements! SHOP & SAVE
Steps
|
1
Done
|
Place the Water, Yeast, Honey and Salt Into a Large Mixer With Standard Mixing Blade. Mix Well. |
|
2
Done
|
Add One Cup of Bread Flour, One Cup of Whole Wheat Flour, and the Gluten. Mix Well, Don't Be Afraid to Let It Run a Couple of Minutes. It Will Work Up the Gluten. |
|
3
Done
|
Add Another Cup Flour and Mix Well. the Dough Should Be Sticky and a Bit Stringy. When the Blade Is Raised the Dough Should Come Off the Blade With Ease. It May Almost Peeling Itself Away. This Is Due to the Gluten. Do So and Replace With a Dough Hook. |
|
4
Done
|
Add the Last of the Flour, Due to Weather and Humidity of Your Climate It May Take a Smidge Tablespoon More or Less Flour or Warm Water Until You Get the Texture You Need. Let the Mixer Run For 3-5 Minutes or Until the Dough Is Soft and Springs Back When Touched. |
|
5
Done
|
Remove the Dough to a Dry Lightly Dusted Surface and Hand Knead For a Few Minutes. Relax and Enjoy the Soft Firm Texture. |
|
6
Done
|
Separate the Dough Into 8 Portions. Set the Dough Aside and Cover With a Non Terry Linen For 30 Minutes. |
|
7
Done
|
Roll Down Each Ball With Your Palm on a Dusted Surface Forming a Small Disc. Then, With a Rolling Pin Form 8, 7 Inch Diameter Discs. They Should Be Around 1/4 Inch Thick. Set Aside and Cover With a Damp Linen. Let Them Rest For 15 Minutes. |
|
8
Done
|
While They Rest Put a Stone or a Baking Sheet Into Your Oven and Turn the Oven on to 450 Degrees. I Highly Recommend a Stone If You Use This Recipe Often. |
|
9
Done
|
After the Fifteen Minutes Starting With the First Pita You Rolled Out, Put a Few of Them Onto the Stone or Sheet. Do not Crowd! They Need the Circulated Air. |
|
10
Done
|
Cook Each Pita For 6 Minutes or Until They Puff in the Center. Do not Brown Them. When They Fully Puff They Are Done. |

