Ingredients
-
1
-
-
-
-
-
-
-
-
-
-
-
-
-
-
Directions
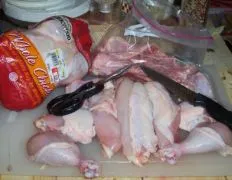
How to Cut up a Chicken, Why cut up your own chickens? First, to save money Whole chickens often run $1/lb less than chicken parts Since most fryers run in the 4lb range you can save $4 for putting in less than 10 minutes work — $24/hour is nothing to sneeze at Second, you can cut to suit your family As these directions show, I cut my breasts in thirds so that all the pieces are the same size (people my age and older will remember when KFC used to do that) That way you don’t have small pieces drying out before the big ones are cooked through and you can serve white meat to a child who wants it without giving him/her more than he/she can manage to eat And you get all the trimmings to use for chicken stock without having to buy backs, necks, and giblets separately — why should the butcher get away with first charging you to cut the chickens up and then charging you more to get the parts they cut off? ;), I gave this 5 stars How awesome! I’m so glad this was posted This was one of the only things I did not learn from my one of several cooking classes I had attended that I so wanted to learn I just learned how to cut up a chicken this week in a cooking class I’m attending I love the step by step pictures here on zaar of the different steps I had never cut up a whole chicken and I’ve been so wanting to try it I like the fact this recipe uses kitchen scissors as I found it hard for me to cut through the bone with a kitchen knife I will for sure try using scissors with these directions The directions are so simple and great step by step The steps are slightly different then our teacher (Chef) taught us He taught us to cut the connecting skin first, break the leg quarters from the joint cut them off Break the wing tips and then cut them off Then cut off the wings Cut the breast off (if using boneless) Cut the chicken in half By the time your done you can get 6-8 pieces of ckicken and even more if you want smaller cuts I know our chef said each person does a different cut as I seen on You Tube When we did out chickens we probably used 3 pound chickens I think it would probably be worth the work to use bigger chickens Thanks so much for posting this and the great pictures I think the next time I’ll try using the scissors Christine (internetnut), I give this 5 stars for a wonderful step by step way to cut up a chicken great pictures!!! I learned many years ago from my mother how to do this nasty chore I agree, it saves soooo much money when you have the time to do it I love the amount of $$$ I save by doing this myself It also impresses my BF when he sees my in the kitchen getting down and dirty and hands on with a few chickens!!! A great post thanks for sharing!!!
Discover ground-breaking new supplements! SHOP & SAVE
Steps
|
1
Done
|
You Will Need a Pair of Sharp, Good-Quality Kitchen Shears and a Sharp Knife at Least 6 Inches Long. |
|
2
Done
|
Unwrap the Chicken and Drain Any Extra Blood Into the Sink. Rinsing the Chicken in Cold Water Is Optional. It Can Tidy Up a Chicken That Is Messy from Processing and Packing, but It Makes the Bird Slippery to Handle. |
|
3
Done
|
If There Are Pads of Fat Just Inside the Cavity Pull Them Away (as Long as the Bird Is Cold the Fat Will Be Solid Enough to Handle). |
|
4
Done
|
Remove the Giblets. Top Brand Birds Will Have the Full Set. Discount Brand Birds Will Have Random Giblets -- Anywhere from None at All to Doubles. |
|
5
Done
|
Cut Off the Wingtips With the Kitchen Shears. |
|
6
Done
|
Cut the Skin Connecting the Thigh to the Body With the Shears or the Knife. |
|
7
Done
|
Bend the Thigh Backwards to Dislocate the Joint. Use the Shears to Cut the Thigh from the Body. |
|
8
Done
|
Bend the Leg Joint Backwards to Dislocate It. (dislocating the Joints Is Optional, but Makes It Easier). Cut Through the Joint from the Inner Side of the Bend. |
|
9
Done
|
Bend the Wing Back to Find the Joint. Dislocate It If Possible (the Wing Joints Are Very Sturdy and Sometimes Can't Be Dislocated Until the White Meat Is Cut to Expose Them). Cut Through the Wing Joint With the Shears from the Inside of the Bend. |
|
10
Done
|
Using the Shears, Cut the Breast Free of the Back Following the Line of the Ribs (there Is Usually a Thin Line of Fat Just on the Breast Side of That Line). |
|
11
Done
|
Note -- the Difficulty of Cutting Through the Shoulder Bones Will Depend on the Age of the Chicken. Fryers Are Easy, Stew Hens More Difficult. If You're Cutting a Turkey You'll Need to Break the Joint. |
|
12
Done
|
Use the Knife to Divide the Breast Lengthwise Into Thirds. Cut the Meat Down to but not Through the Bones. |
|
13
Done
|
Cut the Breast Bones With the Shears. |
|
14
Done
|
Note -- For a Large Roaster, or Stew Hen You May Wish to Halve Each of These Pieces Crosswise to Yield a Total of 6 Pieces of White Meat. |
|
15
Done
|
Alternately, If You Want the Breast Divided in Half You Can Use the Knife to Cut the Skin Exactly Down the Center Then Slide It Down on One Side of the Breastbone. Complete the Cut With the Shears. Sometimes, Depending Upon the Intended Use, Its Even Desirable to Slide the Knife Along Both Sides of the Breastbone and Then Use the Shears to Cut It Out Completely. |


