
Ingredients
-
1
-
16
-
2
-
2
-
2
-
10
-
1
-
2
-
-
-
-
-
-
-
Directions

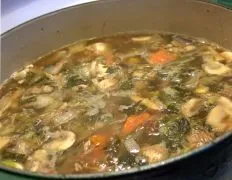
Rescued Turkey Stock,I call this “rescued”, because so many people throw away the turkey carcass after a big meal. Don’t! Rescue it! Making stock is not hard or complicated. You’ll be rewarded with delicious soup, and an amazing aroma will fill your home as you make the stock. And you don’t even have to make soup right away — just freeze the stock!,Updating again in 2021. This has been my go to for 18 years from when I first made it in 2003. The onion skins really help with the colour and I always have a bag of veggie clippings in my freezer to save for making stock. Just updating my review. I can’t believe I first reviewed this 7 years ago. Time flies. Anyway, since I first reviewed this recipe back then, it is my go-to standard recipe for stock at Christmas and Thanksgiving. It never fails. ================WOW! I have always shied away from making stock because I never had any luck with it. Now I know why! I was doing it ALL wrong!I followed the directions and used some of the suggestions from the other reviews. I took the drippings from the roasting pan, added the stuff from the bag in the turkey and the neck, some canned chicken broth left over from making mashed potatoes last night (Christmas dinner) and all the water per the recipe directions and heated it up on the stove until it simmered. I didn’t make homemade gravy last night because I never have good luck with it, so all the drippings remained from the turkey. Once it was heated up, I poured it over the carcass and all the skin. I pulled all the meat from the carass before, put it in a ziploc bag and I will probably make Crockpot Cream cheese Chicken (#33543) with most of it and soup with the rest.I saved clippings and stalks from the celery left over from making the stuffing and waldorf salad, and I had some green onions, green pepper, fresh parsley, a bit of lettuce and cucumber in the fridge that I threw in. I also threw in a few left over brussels sprouts from last night as well as the onions with the skin on… it definitely added to the color of the broth. In the past, mine was always a cloudy color, which didn’t look very appetizing. As for herbs and spices, I added a bay leaf, 2 fresh garlic cloves with the skin, sage and rosemary (both fresh) and thyme. It smelled WONDERFUL as it simmered. It was so quick and easy to make, because you just throw everything in! The most time consuming was pulling the meat from the turkey and even then, it didn’t take long. My dog was going absolutely NUTS as I did this task! I like the ideas from the other reviewers about freezing in ziploc bags. use alot of chicken stock for cooking and now I will save money by having my own homemade stuff on hand. Don’t know if I’ll ever use it to make gravy – I just can’t get the hang of that!All in all a definite keeper that I will make again! Thanks for the very easy and detailed directions!,I have been making this for years. It is such a flavorful stock I usually get 2 batches since I save the wings and legs for the second batch. use 4 of each for the second batch. I make it exactly as written and it is the best!
Discover ground-breaking new supplements! SHOP & SAVE
Steps
|
1
Done
|
First, You Need a Turkey Carcass, Stripped of All Its Meat; If You're Lucky, You'll Be at Someone's Home and They'll Be Throwing It Away-- That's the Time to Shout, I'll Take It! |
|
2
Done
|
You Will Also Likely Discover That You'll Be Able to Rescue a Lot of Meat Off the Carcass; This Is a Bonus, Since You Now Have the Meat For the Soup as Well. |
|
3
Done
|
Try to Make the Stock the Day After the Turkey Was Cooked, but If You Have to Wait Another Day or So, That's Okay; It'll Taste Best, Though, If You Can Get to It Soon. |
|
4
Done
|
Let's Get Started; First, Get Out a Large Pot. |
|
5
Done
|
Next, Start to Strip Off Any Meat Clinging to the Carcass; Put This in a Container and Set Aside; Note That This Is a Hands-on Job and You Will Get a Little Messy; That's Okay, Both Your Hands and Your Counter Wash Up Easily. |
|
6
Done
|
as You Are Stripping Off the Meat (don't Fret, You Won't Get It All, Some Stubbornly Clings to the Bones and That's Okay, It Too Flavours the Stock), Continue to Break Up the Bones and Put Them in the Pot; Also Put in the Pot Any Turkey Skin and All the Other Assorted"bits" That Aren't Edible Meat. |
|
7
Done
|
When You Have the Pot Full of Bones, Pour the Cold Water Over and Turn Heat to High; Bring to a Boil. |
|
8
Done
|
Now Wash Up and Prepare the Veggies and Parsley; Make Sure to Leave the Onion Skin on as It Gives Your Stock a Lovely Rich Colour. |
|
9
Done
|
When the Stock Comes to a Boil, Add All Remaining Ingredients and Turn Heat Down to a Lightly Bubbling Simmer, the Type Where the Bubbles Barely Break the Surface. |
|
10
Done
|
Now Let It Simmer For 3 to 4 Hours, Stirring Every Once in a While. |


